Deploy a highly-available Cassandra cluster in AWS using Kubernetes
At Merapar, we use Cassandra as the back-bone for some of our highly-available cloud solutions. Cassandra is a highly available, highly performant, truly horizontal scalable NoSQL database. However, deploying Cassandra in the cloud in a highly-available manner is a non-trivial task and needs proper configuration. Fortunately, due to the emergence of new technologies, deploying a Cassandra cluster in AWS is more easy nowadays. This blog will show you how to deploy a Cassandra cluster in AWS, using kops (Kubernetes Operations). It will also show that the setup is highly-available by testing some failure scenarios.
This blog assumes basic knowledge of AWS, Kubernetes and Cassandra.
Deployment
The following picture shows what the final Cassandra deployment in AWS looks like:
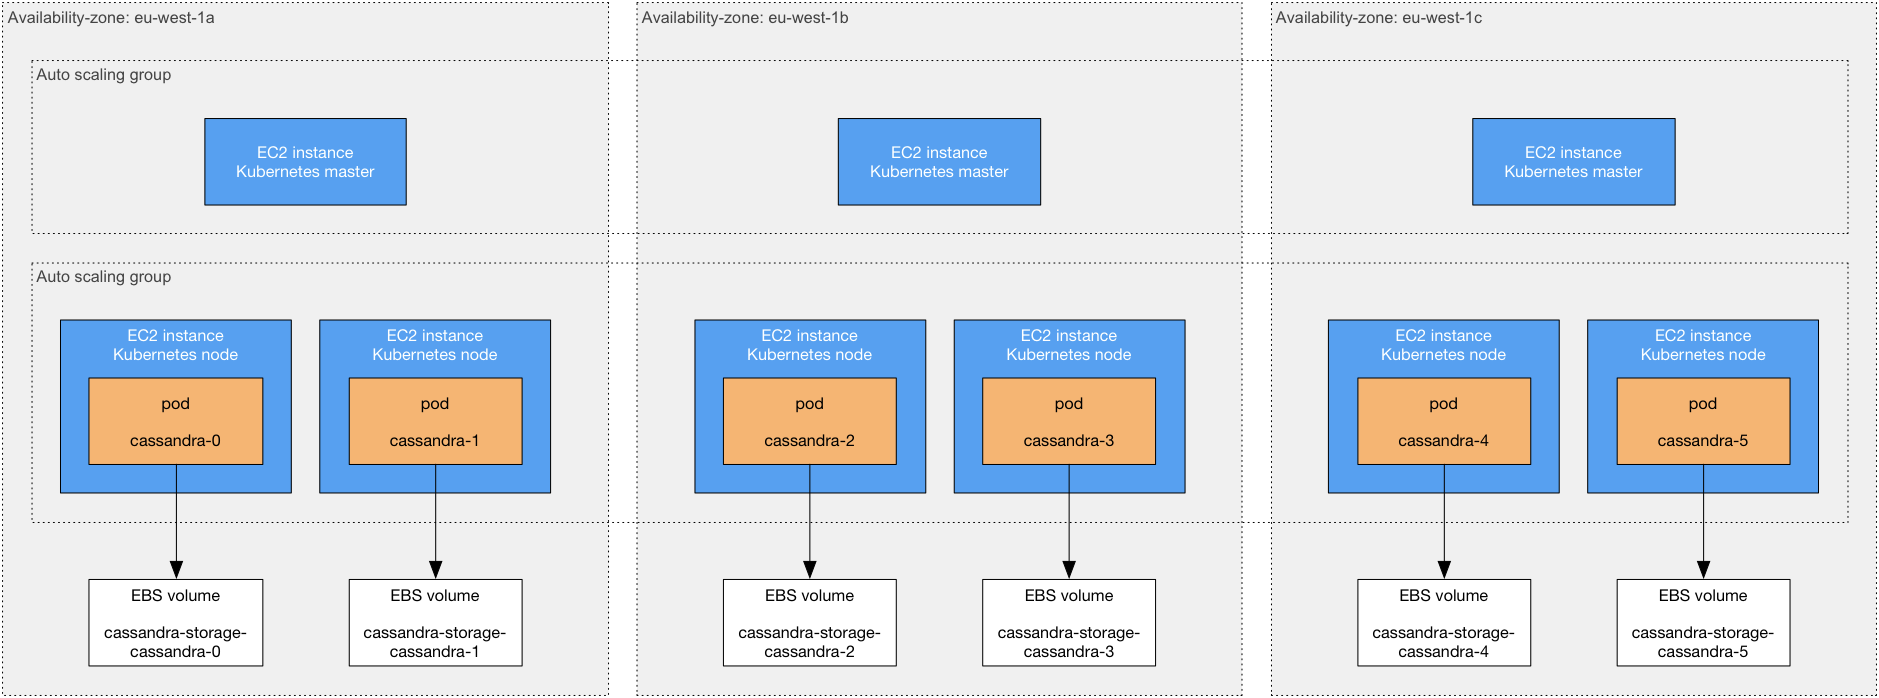
Let’s describe the deployment in detail:
- The deployment uses one geographical region: eu-west-1 (Ireland)
- Within this region, three availability zones are used. An availability zone is an isolated area within a region, i.e. a failure in one availability zone does not impact operations in another availability zone. Hence, high-availability is achieved by spreading processing and storage across availability zones.
- There are three Kubernetes masters, one in each availability zone. A Kubernetes master schedules the pods (containers), that is, it determines which Kubernetes node runs which pod. By having a master in each availability-zone, the Kubernetes masters can continue to schedule pods, even if one availability-zone is down. The master machines are deployed in an auto-scaling group, so if an EC2 instance in this group terminates, a new EC2 instance (and Kubernetes master) is started automatically.
- There are six Kubernetes nodes, two in each availability zone. A Kubernetes node runs your application pods. In this setup, each Kubernetes node will run one Cassandra pod. If one pod fails, a new one will be scheduled by the Kubernetes master. The Kubernetes nodes are also deployed in an auto-scaling group.
- A Kubernetes stateful set with persistent volumes is used to deploy Cassandra: each Cassandra pod has a known identity (e.g. cassandra-0) and a known volume (e.g. cassandra-storage-cassandra-0). The pod identity and volume identity are tightly coupled. This enables a Cassandra pod to restart on another node and transfer its state. When a Cassandra pod starts, it attaches the same EBS volume as previously, and therefore, has the same state as before. EBS volumes are automatically created the first time a Cassandra pod starts.
Now let’s discuss how Cassandra has to be configured in order to replicate the data in multiple availability-zones. This is achieved by setting the following properties:
- Snitch.
The snitch determines to which data-center and rack a node belongs. Cassandra uses the terms “data-center” and “rack” to identify the network topology. The EC2Snitch is used. When a Cassandra node starts, the EC2Snitch retrieves the region and availability-zone information from the EC2 meta-data endpoint: the data-center is set to the region and the rack is set to the availability-zone. - Replication factor.
This determines the number of data copies. A replication-factor of three is used, i.e. three replicas are stored on different nodes. - Replication strategy
This property determines which nodes store the replicas. The NetworkTopologyStrategy is used. With this strategy, a replica is stored in each availability-zone. How this is done precisely, is discussed next.
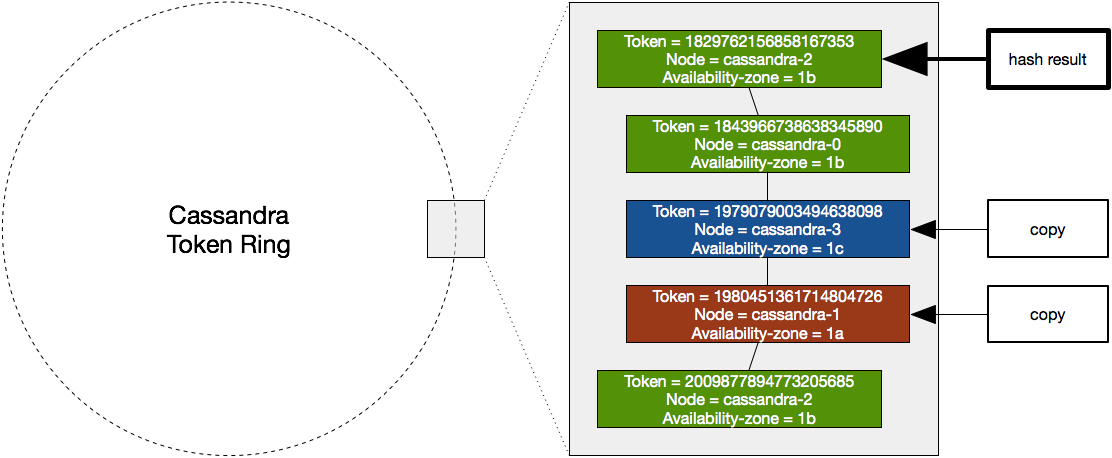
The following picture shows how data is stored. Each Cassandra node creates multiple tokens (32 in our case). Each token is a random number between -2⁶³ to 2⁶³ -1. The Cassandra token ring is a virtual ring in token order of all tokens (192 in our case: 32 tokens * 6 nodes). When a row must be stored, its key is hashed and the result determines where on the ring the record is stored. Imagine the key of a record is hashed to a number between 1829762156858167353 and 1843966738638345890. In the picture below you can see that this corresponds to the top token. This token belongs to cassandra-2. This means cassandra-2 in zone 1b stores the record. Subsequently, the ring is followed clockwise until two additional nodes are found in other availability-zones. In this example, the other replicas are stored on cassandra-3 and cassandra-1.
Step-by-step setup
Next we will install the described deployment from scratch. In order to follow these steps, you only need an AWS account and a Linux machine to run the commands from. We use the following versions for the various components:
- Ubuntu 16.04
- Kops 1.8.1
- Kubernetes 1.7.16
- Cassandra 2.2.9
We use Cassandra 2.2.9 in production with only a few changes from the default configuration. For details see: https://github.com/merapar/cassandra-docker/tree/master/docker. Note that this setup also works perfectly well with newer versions of Cassandra.
Kubernetes setup
First, you need the kops command, which is used to setup the infrastructure in AWS:
curl -LO https://github.com/kubernetes/kops/releases/download/1.8.1/kops-linux-amd64
sudo mv kops-linux-amd64 /usr/local/bin/kops && sudo chmod a+x /usr/local/bin/kops
You need the kubectl command to interact with the Kubernetes cluster in AWS:
curl -LO https://storage.googleapis.com/kubernetes-release/release/v1.7.16/bin/linux/amd64/kubectl
sudo mv kubectl /usr/local/bin/kubectl && sudo chmod a+x /usr/local/bin/kubectl
Kops uses the awscli command to interact with AWS. On Ubuntu, you can install this tool via:
apt-get install awscli
Other means to install awscli can be found here: https://docs.aws.amazon.com/cli/latest/userguide/installing.html
Now you have to make sure there is an IAM user which kops can use to install the required components in AWS. The IAM user needs programmatic access (i.e. use an access-key and secret-access-key to login). In addition, the IAM user requires the following permissions: AmazonEC2FullAccess AmazonRoute53FullAccess AmazonS3FullAccess IAMFullAccess AmazonVPCFullAccess. More info can be found here: https://github.com/kubernetes/kops/blob/master/docs/aws.md
Now let’s configure AWS:
aws configure
Enter the credentials of the IAM user created in the previous step. We use eu-west-1 as the region. Accept the default output format. Next you have to create an S3 bucket. Kops stores the configuration of the deployment in this bucket
aws s3api create-bucket --bucket kops-cassandra-blog --region eu-west-1
Now generate a public/private key-pair:
ssh-keygen -f kops-cassandra-blog
This key-pair is used to access the EC2 machines. The following command creates the cluster definition:
kops create cluster \
--cloud=aws \
--name=kops-cassandra-blog.k8s.local \
--zones=eu-west-1a,eu-west-1b,eu-west-1c \
--master-size="t2.small" \
--master-zones=eu-west-1a,eu-west-1b,eu-west-1c \
--node-size="t2.small" \
--ssh-public-key="kops-cassandra-blog.pub" \
--state=s3://kops-cassandra-blog \
--node-count=6
Now apply the cluster definition, i.e. create the actual resources in AWS:
kops update cluster --name=kops-cassandra-blog.k8s.local --state=s3://kops-cassandra-blog --yes
After a few minutes, we will have a high-available Kubernetes cluster in AWS. Kops automatically configures kubectl. Use the following command to check the Kubernetes master nodes (the -L argument shows labels, while the -l argument filters on labels):
kubectl get no -L failure-domain.beta.kubernetes.io/zone -l kubernetes.io/role=master
The following output is visible:
NAME               STATUS  AGE  VERSION  ZONE
ip-172-20-112-210  Ready   1m   v1.8.7   eu-west-1c
ip-172-20-58-140   Ready   1m   v1.8.7   eu-west-1a
ip-172-20-85-234   Ready   1m   v1.8.7   eu-west-1b
As can be seen, the three Kubernetes masters each reside in a separate availability zone. Now run the same command for the Kubernetes nodes:
kubectl get no -L failure-domain.beta.kubernetes.io/zone -l kubernetes.io/role=node
As can be seen in the output, each availability zone has two Kubernetes nodes:
NAME               STATUS    AGE  VERSION  ZONE
ip-172-20-114-66   Ready     1m   v1.8.7   eu-west-1c
ip-172-20-116-132  Ready     1m   v1.8.7   eu-west-1c
ip-172-20-35-200   Ready     1m   v1.8.7   eu-west-1a
ip-172-20-42-220   Ready     1m   v1.8.7   eu-west-1a
ip-172-20-94-29    Ready     1m   v1.8.7   eu-west-1b
ip-172-20-94-34    Ready     1m   v1.8.7   eu-west-1b
You can destroy the environment at all times by running the following command:
kops delete cluster --name=kops-cassandra-blog.k8s.local --state=s3://kops-cassandra-blog --yes
Cassandra setup
Create a file cassandra.yml, containing the following definitions:
apiVersion: v1
kind: Service
metadata:
  name: cassandra
spec:
  clusterIP: None
  ports:
    - name: cql
      port: 9042
  selector:
    app: cassandra
---
apiVersion: "apps/v1beta1"
kind: StatefulSet
metadata:
  name: cassandra
spec:
  serviceName: cassandra
  replicas: 6
  template:
    metadata:
      labels:
        app: cassandra
    spec:
      affinity:
        podAntiAffinity:
          requiredDuringSchedulingIgnoredDuringExecution:
          - topologyKey: kubernetes.io/hostname
            labelSelector:
              matchLabels:
                app: cassandra
      containers:
        - env:
            - name: MAX_HEAP_SIZE
              value: 512M
            - name: HEAP_NEWSIZE
              value: 512M
            - name: POD_IP
              valueFrom:
                fieldRef:
                  fieldPath: status.podIP
          image: merapar/cassandra:2.3
          name: cassandra
          volumeMounts:
            - mountPath: /cassandra-storage
              name: cassandra-storage
  volumeClaimTemplates:
  - metadata:
      name: cassandra-storage
    spec:
      accessModes:
      - ReadWriteOnce
      resources:
        requests:
          storage: 10Gi
And run
kubectl create -f cassandra.yml
The following components are installed within the timespan of a few minutes:
- Service cassandra. This service is used by clients within the Kubernetes cluster to connect to Cassandra. It does not have a cluster-IP. This is on purpose because Cassandra node-discovery and load-balancing is handled by the Cassandra client itself (not via Kubernetes). The client library connects to one contact point only: the cassandra DNS name. This is translated by the DNS pod to the IP address of one of the Cassandra pods. That pod will tell the IP addresses of the other Cassandra pods.
- StatefulSet cassandra. The stateful set makes sure that there are six Cassandra pods running at all times with a fixed identity: cassandra-0 up to and including cassandra-5.
In order to connect to the Cassandra cluster, we use the cqlsh command which is available on each node:
kubectl exec -ti cassandra-0 cqlsh cassandra-0
This opens a CQL prompt and lets you interact with the cluster using CQL. The command “cqlsh cassandra-0” actually connects to the server listed in the first argument (cassandra-0). So in this case, it connects to itself.
Now we are going to create a key-space, a table and 100 records. First set the consistency level:
CONSISTENCY QUORUM;
Quorum means that a majority of the replica’s (2 in our case) must be read or written in order for the read or write command to succeed. Now create the key-space:
CREATE KEYSPACE test WITH REPLICATION = { 'class' : 'NetworkTopologyStrategy', 'eu-west' : 3 };Switch to the test key-space:
USE test;
Create a table
CREATE TABLE persons (id uuid, name text, PRIMARY KEY (id));
Now run the following command 100 times to insert 100 records. We need enough records so that each node contains replicas.
INSERT INTO persons (id,name) VALUES (uuid(),'name');
You can also run a script from the cassandra-0 machine:
kubectl exec -ti cassandra-0 bash
With the following loop:
for i in {1..100}
 do
   echo "adding customer $i"
   cqlsh cassandra-0 -e "USE test; CONSISTENCY QUORUM; INSERT INTO persons (id,name) VALUES (uuid(),'name');"
 done
Now run the following command and make sure 100 records are returned:
SELECT * FROM persons;
Testing the high-availability
Now that we have a Cassandra cluster in AWS with some data inside, we can test the high-availability. Note that this setup is only resilient against failures in one availability-zone. In order to be resilient against multiple concurrent availability-zone failures, one should consider using a disaster recovery site in another region. While running the failure scenarios in the following sections, the select query presented earlier on should always return 100 records, i.e. Cassandra should be high-available (all data should be available) at all times.
EC2 instance failure
Note that we will only test Kubernetes-node failure (not Kubernetes-master failure). Let’s terminate an EC2 instance via the AWS console. We should not terminate an EC2 instance running the cassandra-0 pod. Otherwise our CQL prompt terminates. Via the following commands:
kubectl get no -L failure-domain.beta.kubernetes.io/zone
kubectl get po -o wide
We can construct the following table:
Cassandra-node  EC2 instance       Availability-zone
----------------------------------------------------
cassandra-0     ip-172-20-94-34    eu-west-1b
cassandra-1     ip-172-20-116-132  eu-west-1c
cassandra-2     ip-172-20-42-220   eu-west-1a
cassandra-3     ip-172-20-94-29    eu-west-1b
cassandra-4     ip-172-20-114-66   eu-west-1c
cassandra-5     ip-172-20-35-200   eu-west-1a
For this test, we will terminate instance ip-172–20–116–132 which will terminate cassandra-1. AWS will try to launch a new EC2 instance in the availability zone with the fewest instances. In our case, the auto-scaling group called “nodes” contains one instance for the eu-west-1c zone, while it contains two for the other zones. Therefore, the new instance is launched in eu-west-1c. Note that this is best effort; if a whole availability-zone is down for an extended period of time, manual intervention is required to recover. This will be discussed later-on. When requesting the pods, the following output is visible:
NAME          READY     STATUS    RESTARTS   AGE
cassandra-0   1/1       Running   0          1h
cassandra-1   0/1       Pending   0          8s
cassandra-2   1/1       Running   1          1h
cassandra-3   1/1       Running   4          1h
cassandra-4   1/1       Running   0          1h
cassandra-5   1/1       Running   0          1h
While the EC2 instance is starting, the status of the pod is pending. The read-query, as expected, still returns 100 rows. This is because we use quorum reads: we need two of the three replicas and since all zones contain one replica, the read succeeds. Pod cassandra-1 will be rescheduled to the new EC2 instance. The following policies apply during rescheduling:
- When a Kubernetes node is started, it automatically gets a label with availability-zone information. When Kubernetes schedules pods of a stateful set, it tries to spread them across the availability-zones. Persistent volumes (the EBS volume) of a pod are also located in a particular availability-zone. When a persistent volume is created, it too gets a label with availability-zone information. Now, when a pod is scheduled and claims a volume, Kubernetes makes sure the pod is scheduled to a node in the same availability zone as the volume. In our case, cassandra-1 must be rescheduled. This pod claims (wants to link) volume cassandra-storage-cassandra-1. Since this volume is located in zone eu-west-1c, cassandra-1 will get scheduled on a node running in eu-west-1c
- We use anti-pod-affinity to make sure a Kubernetes node runs a maximum of one Cassandra pod. Although it is perfectly viable to run without this policy, it has two benefits: While the new EC2 instance is starting, the Cassandra pod is not started on the remaining nodes. Therefore, no manual rescheduling is required afterwards ( in order to balance the pods). The second benefit is that the full resources of the node are available for the Cassandra node. Note that the same can be achieved using other means (e.g. using resource quotas)
Availability zone failure
In order to test this scenario, we will terminate Cassandra nodes running in zone eu-west-1a: cassandra-2 (EC2 instance ip-172–20–42–220) and cassandra-5 (EC2 instance ip-172–20–35–200). The “get pods” command now shows only five nodes, of which one is in the pending state:
NAME          READY     STATUS    RESTARTS   AGE
cassandra-0   1/1       Running   0          2h
cassandra-1   1/1       Running   0          18m
cassandra-2   0/1       Pending   0          55s
cassandra-3   1/1       Running   4          2h
cassandra-4   1/1       Running   0          2h
Since Cassandra replicates data across all zones, all data is still available. This can be confirmed by running the read query which still return 100 records.
The recovery process for this scenario is basically the same as the single EC2 instance failure scenario describe in the previous scenario. Although very rare, an availability-zone can fail in such a way that instances cannot be restarted in the failing zone, but are started in another zone instead. More information can be found here: https://docs.aws.amazon.com/autoscaling/ec2/userguide/as-add-availability-zone.html
The previous scenario described how pods with volume claims are scheduled. Because there will be a mismatch between the new EC2 instance zone-info and the volume zone-info, the pods cannot reschedule. Manual intervention is required. When the failing availability-zone is up again, terminate all machines which could previously not start in the failing availability-zone and all should recover automatically.
Final remarks
In this post, we have shown how to deploy a high-available Cassandra cluster in AWS. We have also shown that the deployment automatically recovers from node failures in the same availability zone. In a next post, we will discuss scaling the cluster horizontally. Another topic, not discussed here, is performance, which might also be the subject of a future post.